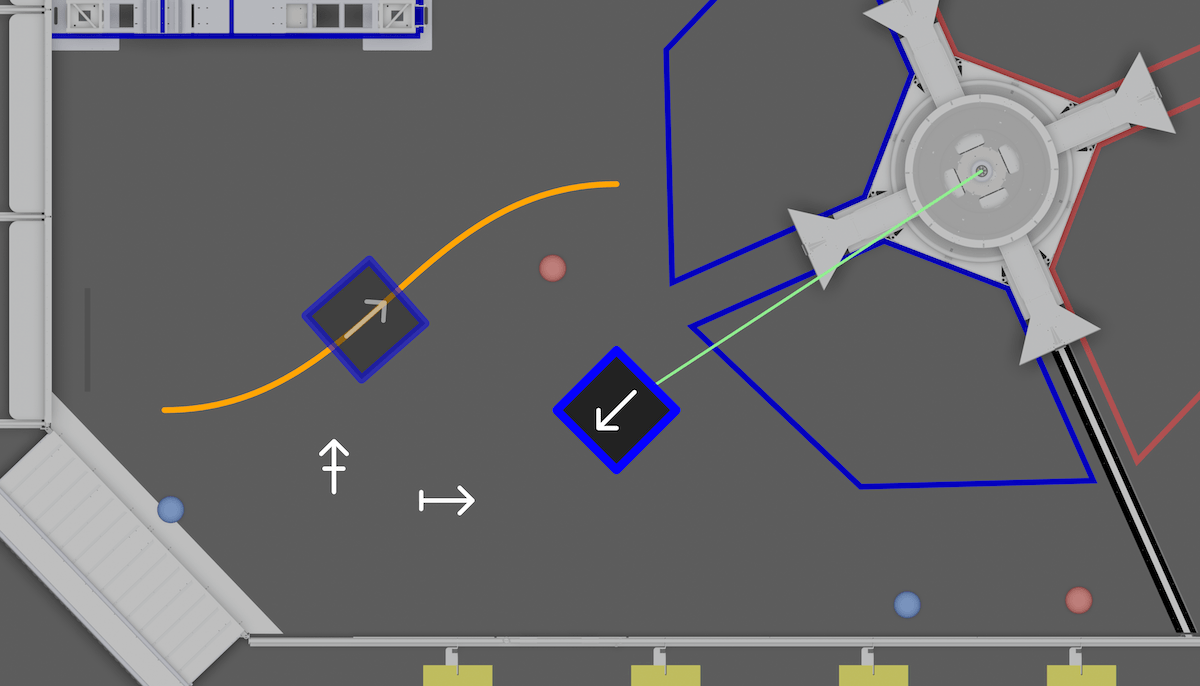
🗺 2D Field
The 2D field tab shows a 2D visualization of the robot overlayed on a map of the field. It can also show extra data like vision targeting status and reference poses.

Timeline Controls
The timeline is used to control playback and visualization. Clicking on the timeline selects a time, and right-clicking deselects it. The selected time is synchronized across all tabs, making it easy to quickly find this location in other views.
The green sections of the timeline indicate when the robot is autonomous, and the blue sections indicate when the robot is teleoperated.
To zoom, place the cursor over the timeline and scroll up or down. A range can also be selecting by clicking and dragging while holding Shift. Move left and right by scrolling horizontally (on supported devices), or by clicking and dragging on the timeline. When connected live, scrolling to the left unlocks from the current time, and scrolling all the way to the right locks to the current time again. Press Ctrl+\ to zoom to the period where the robot is enabled.

Adding Objects
To get started, drag a field to the "Poses" section. Delete an object using the X button, or hide it temporarily by clicking the eye icon or double-clicking the field name. To remove all objects, click the trash can near the axis title and then Clear All. Objects can be rearranged in the list by clicking and dragging.
To customize each object, click the colored icon or right-click on the field name. AdvantageScope supports a large number of object types, many of which can be customized (such as changing colors). Some objects must be added as children to an existing object.
To see a full list of supported object types, click the ? icon. This list also includes the supported data types and whether the objects must be added as children.
Data Format
Geometry data should be published as a byte-encoded struct or protobuf. Various 2D and 3D geometry types are supported, including Pose2d, Pose3d, Translation2d, Translation3d, and more.
The legacy number array format for geometry data is now deprecated. See here for details.
Many libraries support the struct format, including WPILib and AdvantageKit. The example code below shows how to log 2D pose data in Java.
- WPILib
- AdvantageKit
- FTC Dashboard
Pose2d poseA = new Pose2d();
Pose2d poseB = new Pose2d();

StructPublisher<Pose2d> publisher = NetworkTableInstance.getDefault()
  .getStructTopic("MyPose", Pose2d.struct).publish();
StructArrayPublisher<Pose2d> arrayPublisher = NetworkTableInstance.getDefault()
  .getStructArrayTopic("MyPoseArray", Pose2d.struct).publish();

periodic() {
  publisher.set(poseA);
  arrayPublisher.set(new Pose2d[] {poseA, poseB});
}
WPILib's Field2d class can also be used to log several sets of 2D pose data together.
Pose2d poseA = new Pose2d();
Pose2d poseB = new Pose2d();

Logger.recordOutput("MyPose", poseA);
Logger.recordOutput("MyPoseArray", poseA, poseB);
Logger.recordOutput("MyPoseArray", new Pose2d[] {poseA, poseB});
// This protocol does not support the modern struct format, but pose
// values can be published using separate fields that include the
// suffixes "x", "y", and "heading" (as shown below):
TelemetryPacket packet = new TelemetryPacket();
packet.put("Pose x", 6.3); // Inches
packet.put("Pose y", 2.8); // Inches
packet.put("Pose heading", 3.14); // Radians

// Alternatively, headings can be published in degrees
packet.put("Pose heading (deg)", 180.0); // Degrees

// Add other telemetry values here...

FtcDashboard.getInstance().sendTelemetryPacket(packet)

// Alternately, use MultipleTelemetry and the standard SDK telemetry:
// During OpMode Init:
telemetry = new MultipleTelemetry(telemetry,FtcDashboard.getInstance().getTelemetry());

// During Loop:
telemetry.addData("Pose x", 6.3); // Inches
telemetry.addData("Pose y", 2.8); // Inches
telemetry.addData("Pose heading", 3.14); // Radians

// or...
telemetry.addData("Pose heading (deg)", 180.0); // Degrees

// Add other telemetry values here...
telemetry.update();
Configuration
- Field: The field image to use. All recent FRC and FTC games are supported. To add a custom field image, see Custom Assets.
- Orientation: The orientation of the field image in the viewer pane.
- Size: The side length of the robot (30 inches, 27 inches, or 24 inches).
The coordinate system used on the this tab is customizable. See the coordinate system page for details.